How to install Mastodon Social Network with Docker on Ubuntu 18.04 LTS
This tutorial exists for these OS versions
- Ubuntu 22.04 (Jammy Jellyfish)
- Ubuntu 18.04 (Bionic Beaver)
On this page
- Prerequisites
- Step 1 - Installing Dependencies
- Step 2 - Configuring Firewall
- Step 3 - Install Docker
- Step 4 - Install Docker Compose
- Step 5 - Install Mastodon
- Step 6 - Install and Configure Nginx
- Step 7 - Install and Configure Let's Encrypt
- Step 8 - Create your Mastodon User
- Step 9 - Maintenance
- Step 10 Upgrading your Mastodon
Mastodon is a free, decentralized and open-source social network. It was created as an alternative to Twitter. Just like Twitter people can follow each other, post messages, images, and videos. But unlike Twitter, there is no central store or authority for the content.
Instead, Mastodon operates across thousands of different servers each run various members of the community. Users signed up on one server can easily connect to users on the other network and follow each other across instances.
Anyone can install their own instance of a Mastodon server. This tutorial will teach you how to set up your instance of Mastodon on a server with Ubuntu 18.04 using Docker.
Prerequisites
-
An Ubuntu 18.04 based server with a non-root sudo user.
-
Ensure your system is up to date.
$ sudo apt update $ sudo apt upgrade -
Mastodon sends email notifications to users. One option to make it work is to set up your own mail server. You can do it on the same server as you will be installing mastodon or on a different server. Doing it is out of the scope of this guide.
We will recommend you to use a 3rd party Transactional mail service like Mailgun, Sendgrid, Amazon SES or Sparkpost. The instructions in the guide will be using Mailgun as your SMTP provider.
-
Make sure you have a domain name pointing to the server. For this tutorial, we will be using example.com as the domain.
Step 1 - Installing Dependencies
Before we install Mastodon, we need to make sure our server has certain software that it will need to install properly. Run the following commands to install the dependencies.
$ sudo apt update
$ sudo apt install ca-certificates curl ufw apt-transport-https software-properties-common git -y
Some of the software above may be pre-installed for you.
Since we installed Git, we should configure it before proceeding.
$ git config --global user.name "Your Name"
$ git config --global user.email "[email protected]"
Step 2 - Configuring Firewall
In our previous step, we installed, ufw (Uncomplicated Firewall). Before we can proceed to install Mastodon, we need to configure it.
Enable SSH and the port we just created so that we don't get locked out.
$ sudo ufw allow OpenSSH
Enable the ufw firewall.
$ sudo ufw enable
We also need to enable http and https for Mastodon to operate.
$ sudo ufw allow http
$ sudo ufw allow https
Check the status of the firewall.
$ sudo ufw status
You should see an output like the following.
Status: active

To                         Action      From
--                         ------      ----
OpenSSH                    ALLOW       Anywhere
80/tcp                     ALLOW       Anywhere
443/tcp                    ALLOW       Anywhere
OpenSSH (v6)               ALLOW       Anywhere (v6)
80/tcp (v6)                ALLOW       Anywhere (v6)
443/tcp (v6)               ALLOW       Anywhere (v6)
Step 3 - Install Docker
Add Docker's GPG key to your system.
$ curl -fsSL https://download.docker.com/linux/ubuntu/gpg | sudo apt-key add -
Verify the fingerprint of the downloaded key.
$ sudo apt-key fingerprint 0EBFCD88
You should see an output like the following.
pub   rsa4096 2017-02-22 [SCEA]
      9DC8 5822 9FC7 DD38 854A  E2D8 8D81 803C 0EBF CD88
uid           [ unknown] Docker Release (CE deb) <[email protected]>
sub   rsa4096 2017-02-22 [S]
Add the Docker repository.
$ sudo add-apt-repository "deb [arch=amd64] https://download.docker.com/linux/ubuntu $(lsb_release -cs) stable"
Update your package database.
$ sudo apt update
Install Docker-CE. CE is the Community Edition of the Docker.
$ sudo apt install docker-ce -y
Docker should be installed now. Check that it's running.
$ sudo systemctl status docker
The output should be similar to the following.
? docker.service - Docker Application Container Engine
   Loaded: loaded (/lib/systemd/system/docker.service; enabled; vendor preset: enabled)
   Active: active (running) since Tue 2019-10-22 18:26:29 UTC; 25min ago
     Docs: https://docs.docker.com
 Main PID: 3574 (dockerd)
    Tasks: 8
   CGroup: /system.slice/docker.service
   ??3574 /usr/bin/dockerd -H fd:// --containerd=/run/containerd/containerd.sock
Press q to exit.
Add your limited Linux user account to the docker group so that you can run docker without sudo.
sudo usermod -aG docker $USER
$USER variable will pick and add the current logged in user to the docker group. Replace $USER with the actual username if you are not currently logged in with that user.
Switch to the user we just added. Even though you were already logged in, you will still need to switch to it again to reload the permissions.
$ su - ${USER}
Check that everything is running fine by running the built-in "Hello World" program.
$ docker run hello-world
You should see the following output which will tell Docker is installed and working properly.
Unable to find image 'hello-world:latest' locally
latest: Pulling from library/hello-world
1b930d010525: Pull complete
Digest: sha256:c3b4ada4687bbaa170745b3e4dd8ac3f194ca95b2d0518b417fb47e5879d9b5f
Status: Downloaded newer image for hello-world:latest

Hello from Docker!
This message shows that your installation appears to be working correctly.
Step 4 - Install Docker Compose
It's possible to skip this step and proceed but having Docker Compose installed will make running Mastodon much easier especially if you want to do it on more than one server.
$ sudo curl -L "https://github.com/docker/compose/releases/download/1.24.1/docker-compose-$(uname -s)-$(uname -m)" -o /usr/local/bin/docker-compose
At the time of writing this tutorial, 1.24.1 is the current stable release of Docker Compose. You can check for the latest release version from their Github page.
Apply executable permissions to the docker compose binary.
$ sudo chmod +x /usr/local/bin/docker-compose
Add Command Completion to Docker Compose.
$ sudo curl -L https://raw.githubusercontent.com/docker/compose/1.24.1/contrib/completion/bash/docker-compose -o /etc/bash_completion.d/docker-compose
Verify if your installation was successful.
$ docker-compose --version
It will print out the following output.
docker-compose version 1.24.1, build 4667896b
Step 5 - Install Mastodon
Clone Mastodon's repository to your server.
$ git clone https://github.com/tootsuite/mastodon
Navigate to the directory we just copied files into.
$ cd mastodon
Mastodon comes with a sample configuration file. We need to rename it to make Mastodon work.
$ cp .env.production.sample .env.production
We need to generate secret keys for our configuration file. But before that, we need to build the Docker image.
$ docker-compose build
Now that the image is built successfully, you need to create several keys that are required to configure Mastodon.
Generate SECRET_KEY_BASE first.
$ SECRET_KEY_BASE=$(docker-compose run --rm web bundle exec rake secret)
Insert the above key in the configuration file.
$ sed -i -e "s/SECRET_KEY_BASE=/&${SECRET_KEY_BASE}/" .env.production
Generate and insert the OTP_SECRET into the configuration file.
$ OTP_SECRET=$(docker-compose run --rm web bundle exec rake secret)
$ sed -i -e "s/OTP_SECRET=/&${OTP_SECRET}/" .env.production
Generate and insert the PAPERCLIP_SECRET into the configuration file.
$ PAPERCLIP_SECRET=$(docker-compose run --rm web bundle exec rake secret)
$ sed -i -e "s/PAPERCLIP_SECRET=/&${PAPERCLIP_SECRET}/" .env.production
Generate values for VAPID_PRIVATE_KEY and VAPID_PUBLIC_KEY.
$ docker-compose run --rm web bundle exec rake mastodon:webpush:generate_vapid_key
Open the .env.production file.
$ sudo nano ./.env.production
Search for VAPID_PRIVATE_KEY and VAPID_PUBLIC_KEY in the file and copy the output from the previous command.
Find the LOCAL_DOMAIN variable and change its value from example.com to the domain name you have chosen for your Mastodon installation.
Enter the values you got from your SMTP provider.
SMTP_SERVER = smtp.mailgun.org
SMTP_PORT = 587
SMTP_LOGIN = username
SMTP_PASSWORD = password
SMTP_FROM_ADDRESS = [email protected]
Press Ctrl + X and save the file when you are finished.
You need to build the Docker image again to implement all the changes made above.
$ docker-compose build
Set up the database.
$ docker-compose run --rm web rails db:migrate
Pre-compile Mastodon's assets.
$ docker-compose run --rm web rails assets:precompile
Run the following command to execute the container.
$ docker-compose up -d
Step 6 - Install and Configure Nginx
The next step in our guide is to install the Nginx server to make Mastodon's website work.
Run the following command to install the Nginx server.
$ sudo apt install nginx -y
Nginx comes with a default site configured. Remove that.
$ sudo rm /etc/nginx/sites-available/default
Also, remove the symlink for the default site.
$ sudo rm /etc/nginx/sites-enabled/default
Create an Nginx Configuration file for Mastodon.
$ sudo touch /etc/nginx/sites-available/mastodon
Create a symlink for Mastodon's configuration.
$ sudo ln -s /etc/nginx/sites-available/mastodon /etc/nginx/sites-enabled/mastodon
Open Mastodon's configuration in the Nano editor. (You can choose any editor you want)
$ sudo nano /etc/nginx/sites-available/mastodon
Copy-paste the following text into it.
map $http_upgrade $connection_upgrade {
  default upgrade;
  ''      close;
}

server {
  listen 80;
  listen [::]:80;
  server_name example.com;
  root /home/user/mastodon/public;
  # Useful for Let's Encrypt
  location /.well-known/acme-challenge/ { allow all; }
  location / { return 301 https://$host$request_uri; }
}

server {
  listen 443 ssl http2;
  listen [::]:443 ssl http2;
  server_name example.com;

  ssl_protocols TLSv1.2;
  ssl_ciphers HIGH:!MEDIUM:!LOW:!aNULL:!NULL:!SHA;
  ssl_prefer_server_ciphers on;
  ssl_session_cache shared:SSL:10m;

  ssl_certificate     /etc/letsencrypt/live/example.com/fullchain.pem;
  ssl_certificate_key /etc/letsencrypt/live/example.com/privkey.pem;

  keepalive_timeout    70;
  sendfile             on;
  client_max_body_size 80m;

  root /home/user/mastodon/public;

  gzip on;
  gzip_disable "msie6";
  gzip_vary on;
  gzip_proxied any;
  gzip_comp_level 6;
  gzip_buffers 16 8k;
  gzip_http_version 1.1;
  gzip_types text/plain text/css application/json application/javascript text/xml application/xml application/xml+rss text/javascript;

  add_header Strict-Transport-Security "max-age=31536000";

  location / {
    try_files $uri @proxy;
  }

  location ~ ^/(emoji|packs|system/accounts/avatars|system/media_attachments/files) {
    add_header Cache-Control "public, max-age=31536000, immutable";
    try_files $uri @proxy;
  }

  location /sw.js {
    add_header Cache-Control "public, max-age=0";
    try_files $uri @proxy;
  }

  location @proxy {
    proxy_set_header Host $host;
    proxy_set_header X-Real-IP $remote_addr;
    proxy_set_header X-Forwarded-For $proxy_add_x_forwarded_for;
    proxy_set_header X-Forwarded-Proto https;
    proxy_set_header Proxy "";
    proxy_pass_header Server;

    proxy_pass http://127.0.0.1:3000;
    proxy_buffering off;
    proxy_redirect off;
    proxy_http_version 1.1;
    proxy_set_header Upgrade $http_upgrade;
    proxy_set_header Connection $connection_upgrade;

    tcp_nodelay on;
  }

  location /api/v1/streaming {
    proxy_set_header Host $host;
    proxy_set_header X-Real-IP $remote_addr;
    proxy_set_header X-Forwarded-For $proxy_add_x_forwarded_for;
    proxy_set_header X-Forwarded-Proto https;
    proxy_set_header Proxy "";

    proxy_pass http://127.0.0.1:4000;
    proxy_buffering off;
    proxy_redirect off;
    proxy_http_version 1.1;
    proxy_set_header Upgrade $http_upgrade;
    proxy_set_header Connection $connection_upgrade;

    tcp_nodelay on;
  }

  error_page 500 501 502 503 504 /500.html;
}
The above configuration assumes you are using Let's encrypt as your SSL provider. If you are using another SSL service, then you need to edit the location of the keys and skip the next section of the tutorial.
Step 7 - Install and Configure Let's Encrypt
Make sure Nginx is stopped.
$ sudo systemctl stop nginx
Add Certbot repository.
$ sudo add-apt-repository ppa:certbot/certbot
Update System packages.
$ sudo apt update
Install the Certbot tool.
$ sudo apt install certbot
You need to create the certificate twice - once with the TLS SNI method and the second time using the webroot method.
sudo certbot certonly --standalone -d example.com
Now, create the certificate using the webroot method. This will need Nginx to be running.
sudo systemctl start nginx
sudo certbot certonly --webroot -d example.com -w /home/user/mastodon/public/
The tool will ask you if you want to keep the certificate or renew it. Choose the option to renew.
Setup Automatic Renewal of SSL Certificates
Let's Encrypt certificates have a validity of 90 days. After that, you need to renew them again. For that, you can create a cron job to do it automatically for you.
Create a cron job.
$ sudo nano /etc/cron.daily/letsencrypt-renew
Copy and paste the following into the file.
#!/usr/bin/env bash
certbot renew
systemctl reload nginx
Save and exit the file by pressing Ctrl + X and entering Y when prompted.
Make the script executable and restart the cron daemon so that our script runs daily.
$ sudo chmod +x /etc/cron.daily/letsencrypt-renew
$ sudo systemctl restart cron
Step 8 - Create your Mastodon User
Visit your mastodon site in a browser. You should see the following screen.
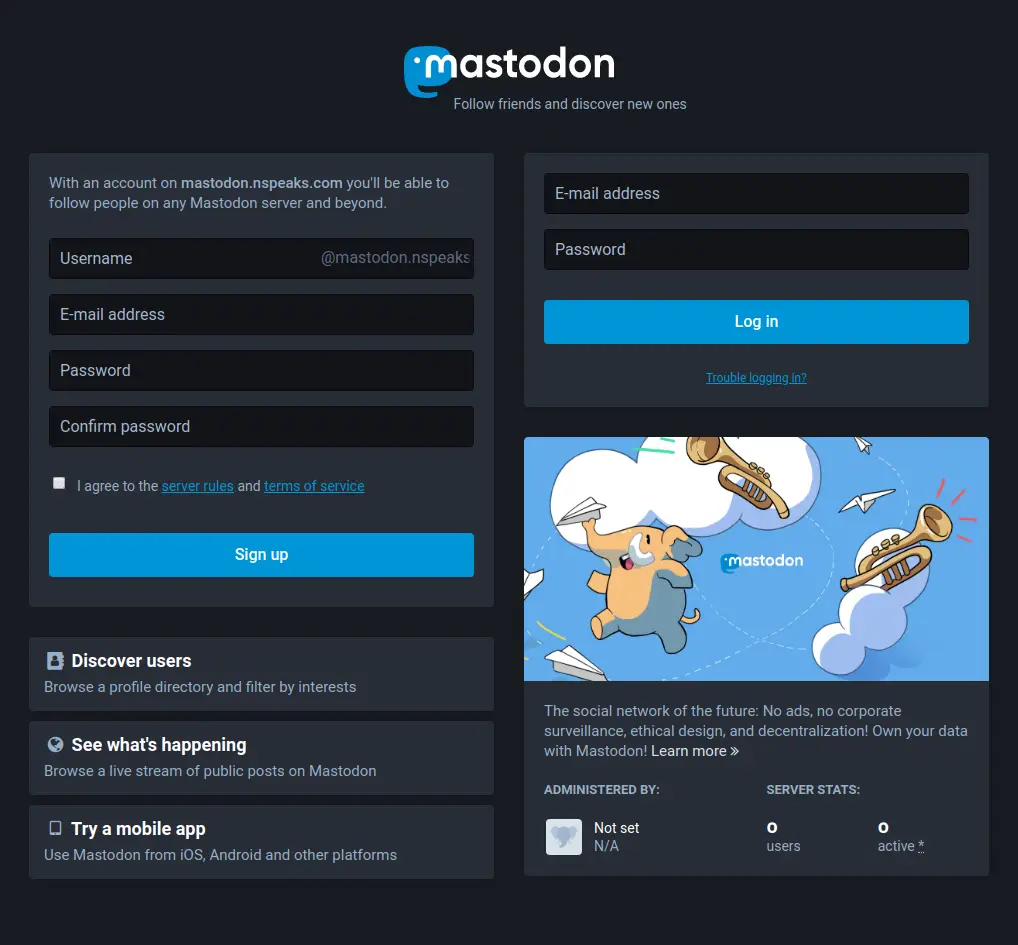
Enter your desired username, email address and password to create a new account on your Mastodon instance. Your full username which you will need to connect to users of other Mastodon servers is howtoforge
Mastodon will send you a confirmation mail to verify the signup.
You can manually confirm the signup as well. For that, you will need to SSH into your Docker instance. List all the current Docker instances.
$ docker ps
You will see an output like below.
CONTAINER ID        IMAGE                 COMMAND                  CREATED             STATUS                  PORTS                      NAMES
32f2c4cd2598        tootsuite/mastodon    "/tini -- bash -c 'r…"   16 hours ago        Up 16 hours (healthy)   127.0.0.1:3000->3000/tcp   mastodon_web_1
76beca2b858d        tootsuite/mastodon    "/tini -- node ./str…"   16 hours ago        Up 16 hours (healthy)   127.0.0.1:4000->4000/tcp   mastodon_streaming_1
08f7a42b75ac        tootsuite/mastodon    "/tini -- bundle exe…"   16 hours ago        Up 16 hours                                        mastodon_sidekiq_1
bacaa8c09a85        redis:5.0-alpine      "docker-entrypoint.s…"   17 hours ago        Up 17 hours (healthy)                              mastodon_redis_1
62e9b2175a53        postgres:9.6-alpine   "docker-entrypoint.s…"   17 hours ago        Up 17 hours (healthy)                              mastodon_db_1
To make the required changes, we need to access the streaming container. SSH into the mastodon_streaming_1 container.
$ docker exec -it mastodon_streaming_1 /bin/bash
This will launch a Bash shell inside your container.
Run the following command to approve your newly created username.
mastodon@76beca2b858d:~$ RAILS_ENV=production bin/tootctl accounts modify howtoforge --confirm
Run the following command to make your newly created account an administrator.
mastodon@76beca2b858d:~$ RAILS_ENV=production bin/tootctl accounts modify howtoforge --role admin
Exit the container.
mastodon@76beca2b858d:~$ exit
Log in to your instance with your username and password and you will be greeted with the following screen.
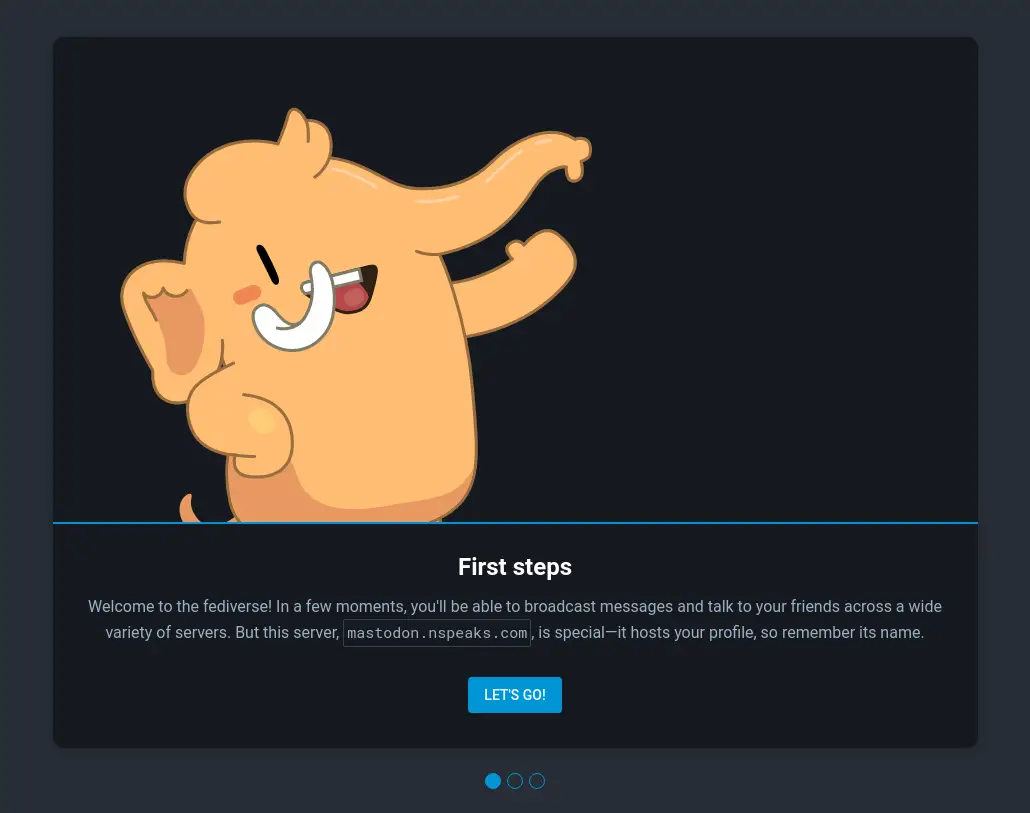
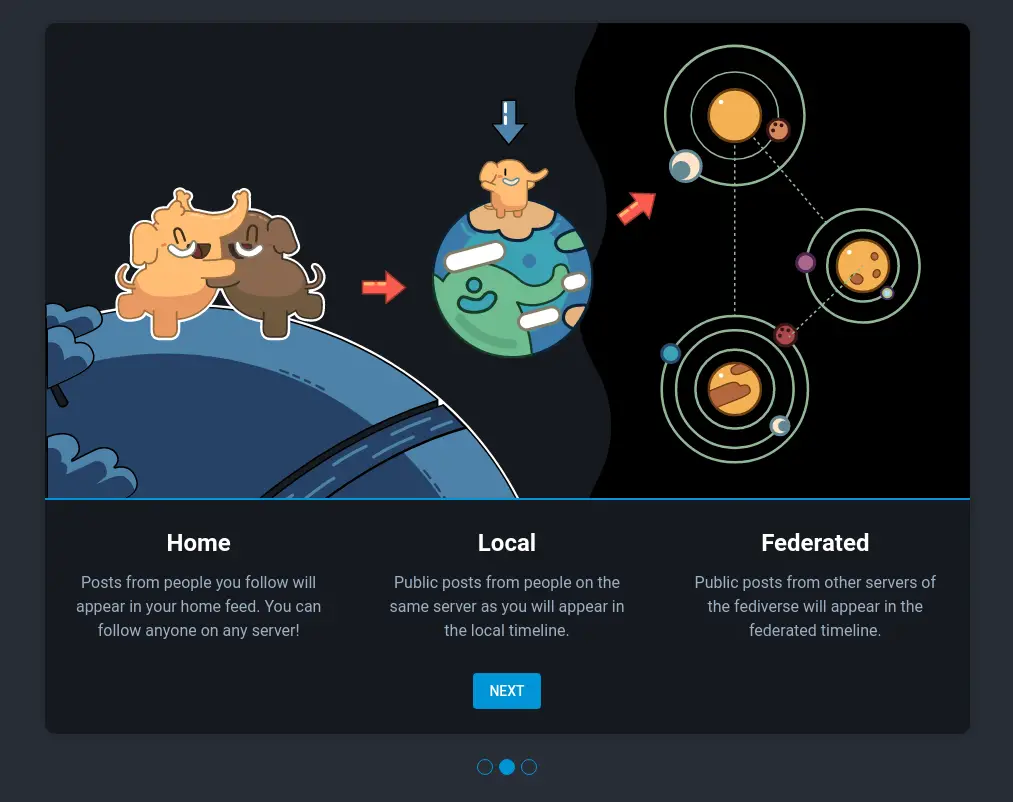
Click Let's Go and you will proceed to the following pages which will let you know about some basics of how Mastodon works.
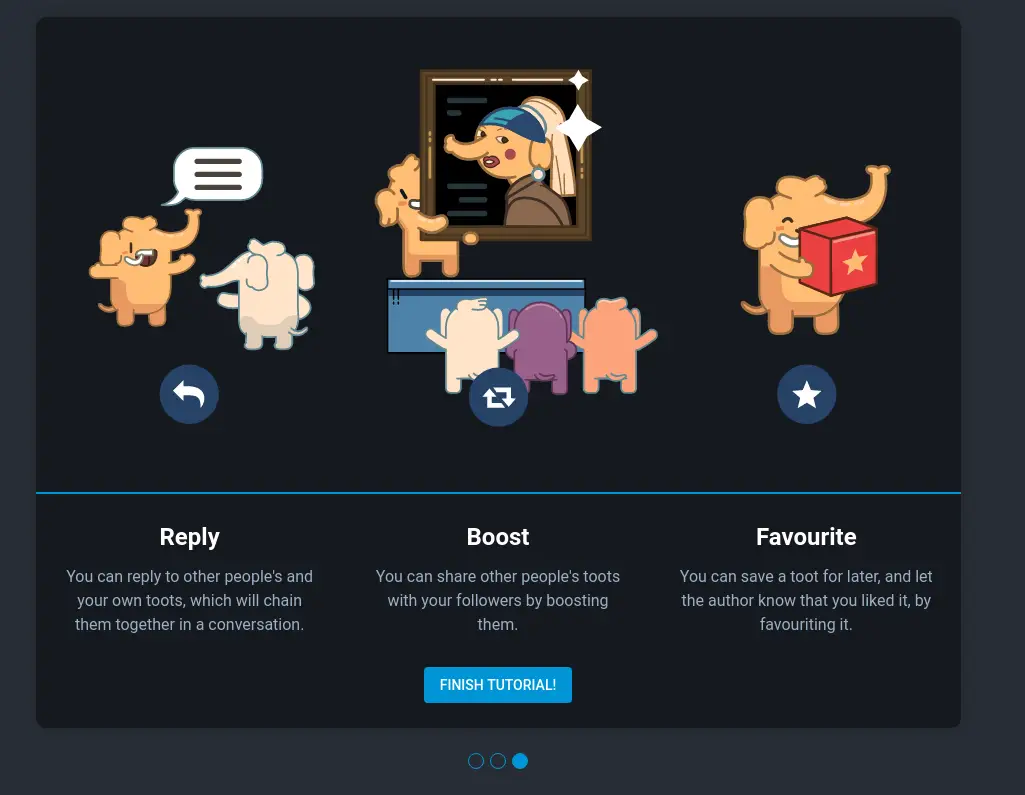
Click on Finish Tutorial to be greeted with your Mastodon's homepage where you can start posting to your heart's content.
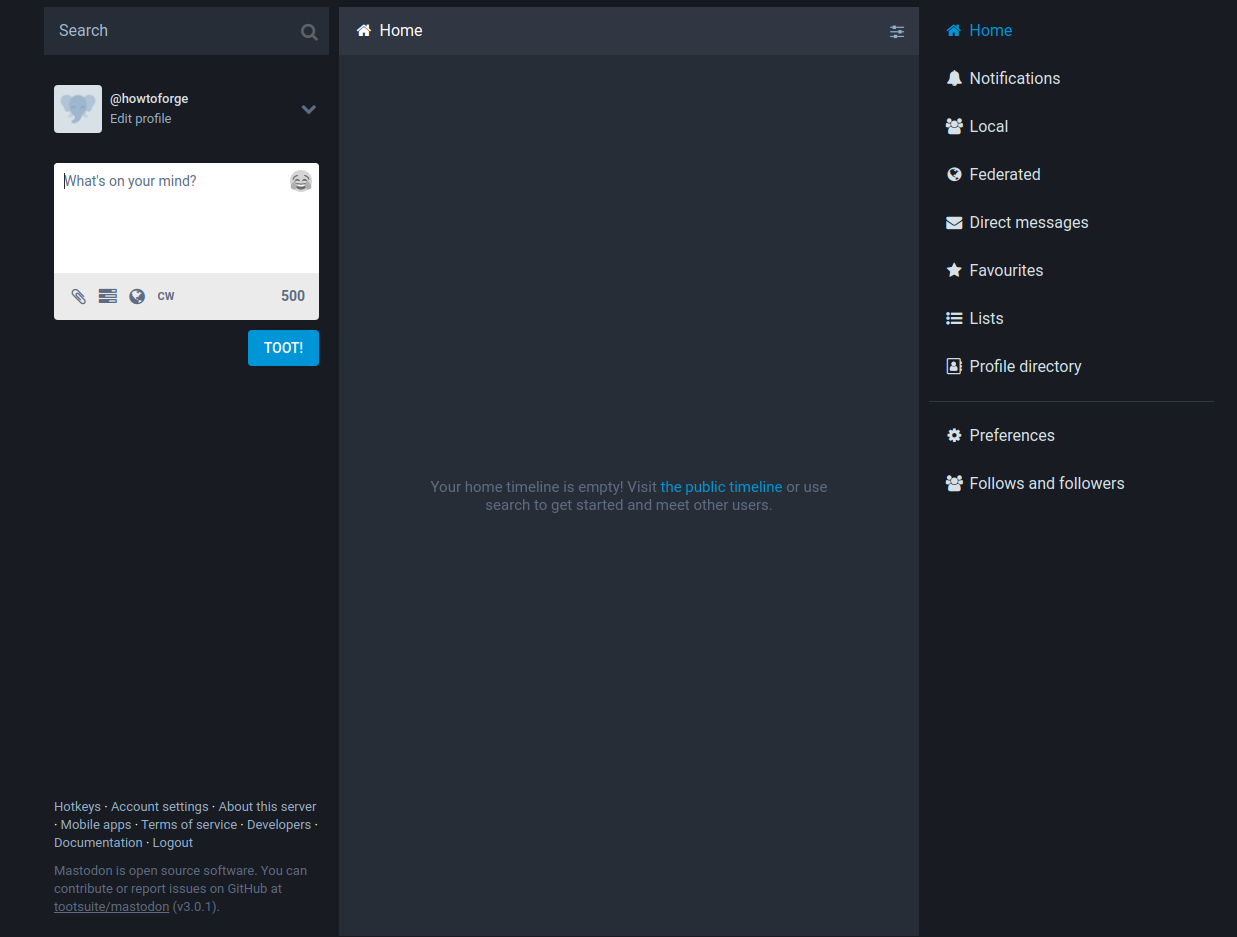
You can access settings and the administration area from the Preferences menu.
Step 9 - Maintenance
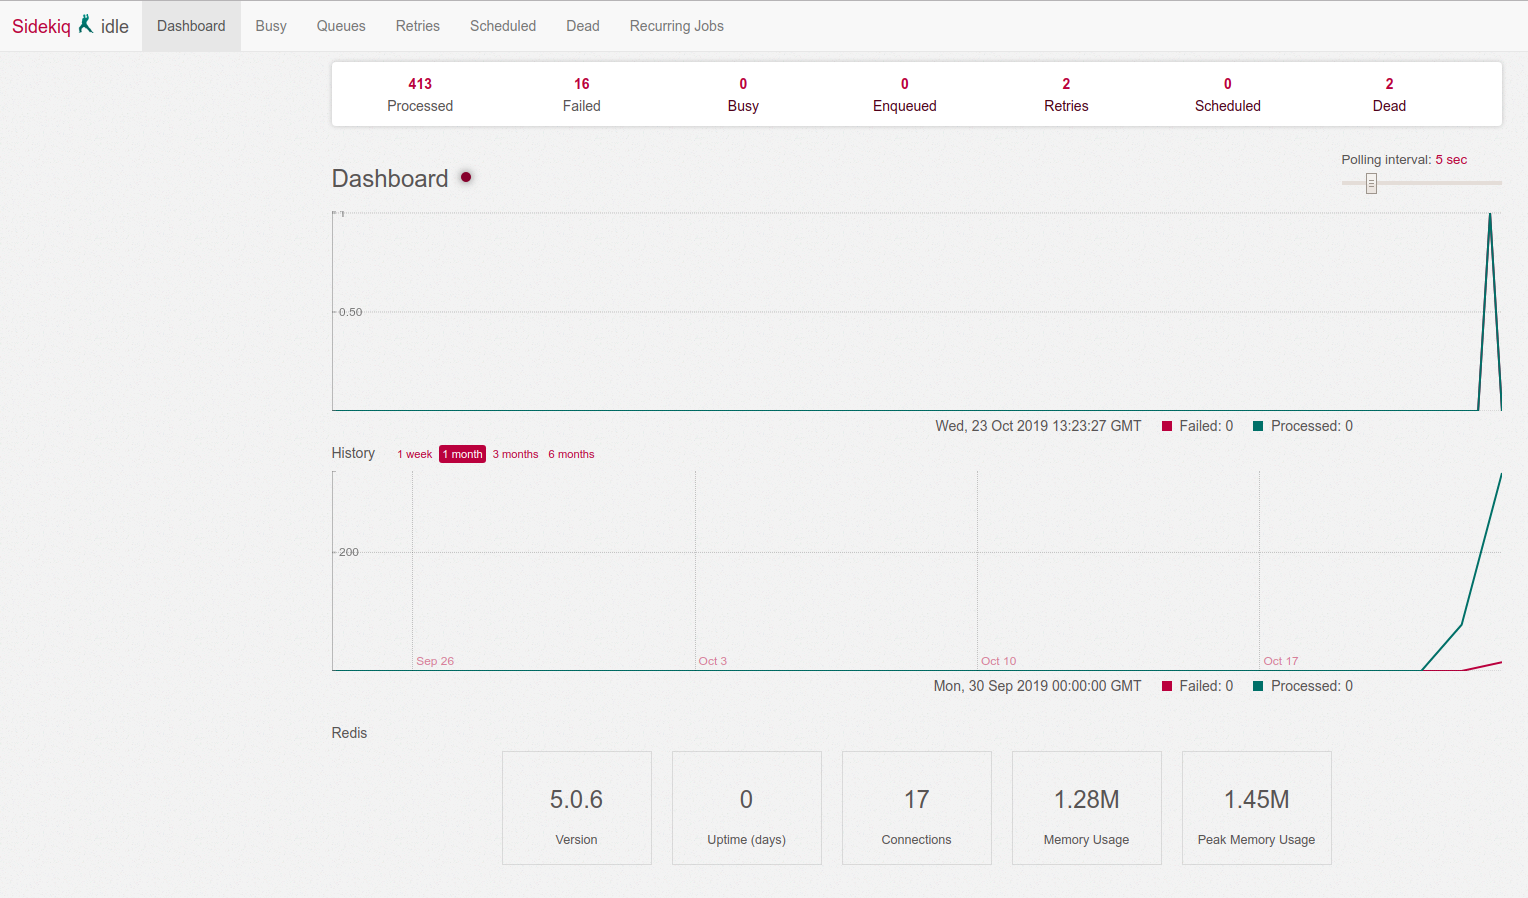
To view the performance and logs of your Mastodon instance, head over to https://example.com/sidekiq/
Here you can view a list of various processes and scheduled tasks related to your Mastodon instance. You can also check for failed tasks under the Dead or Retries section. It will also tell you the memory usage of your instance.
You can check the health of your instance's database from https://example.com/pghero/
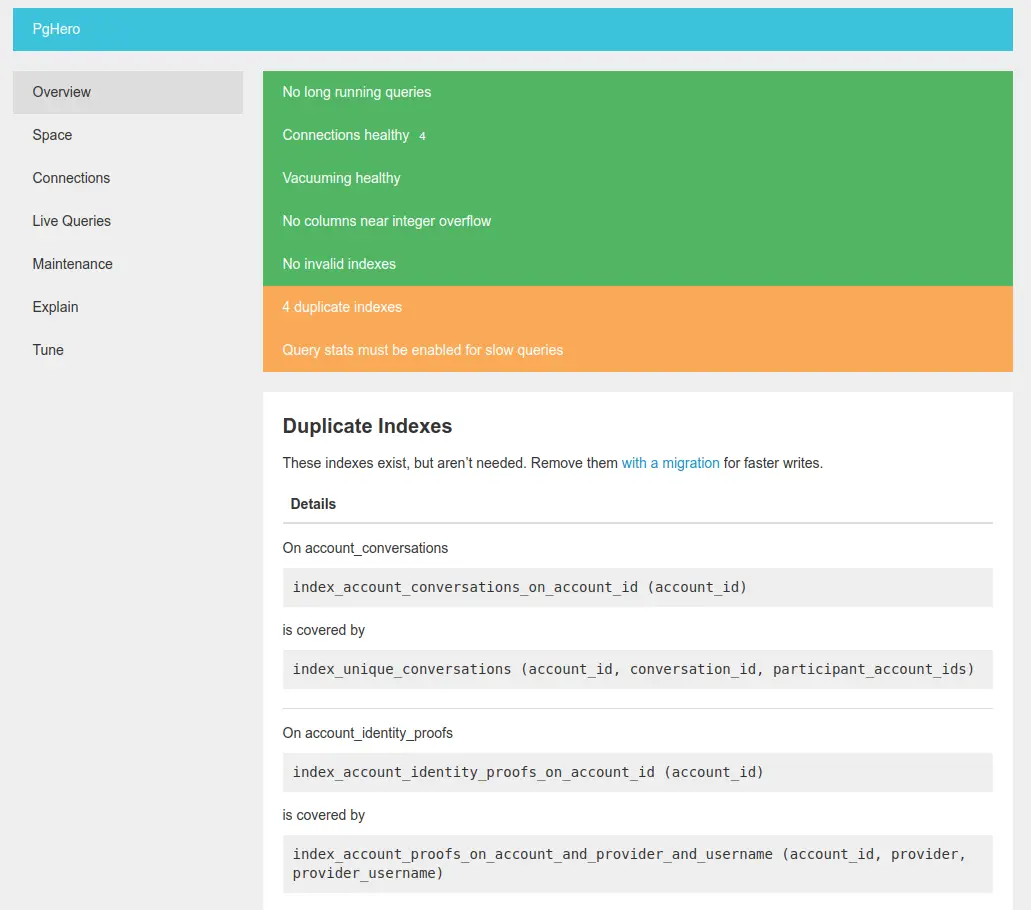
You can perform maintenance of your database, run SQL queries and remove unused indices.
If your site doesn't load at all for some reason, you can check logs generated by Docker.
For that, shut your containers first.
$ docker-compose down
Run Docker compose in an attached state so that you can view logs generated by each container.
$ docker-compose up
Step 10 Upgrading your Mastodon
Switch to your mastodon directory.
$ cd /home/user/mastdon
Download updates from the repository
$ git fetch
If you have changed your docker-compose.yml file for some reason, you need to run the following command first.
$ git status
This will tell you all the changes done to it. If the file is modified, then stash your changes first.
$ git stash
Checkout the latest Mastodon version. Check the latest version from the releases page.
$ git checkout <version/tag>
If you ran git stash earlier, then run the following command to redo your changes to the docker-compose.yml file.
$ git stash pop
Build the docker image.
$ docker-compose build
Perform database migrations.
$ docker-compose run --rm web rails db:migrate
Pre-compile Mastodon's assets.
$ docker-compose run --rm web rails assets:precompile
Run the following command to execute the container.
$ docker-compose up -d
That's all for this tutorial. To learn more about Mastodon follow their docs.

